
A Shop Guide to Cleaner Composite Surfaces and More Reliable Secondary Bonds
Direct bonding after removal is only appropriate when material and process documentation permits it and the procedure has been qualified for that joint.
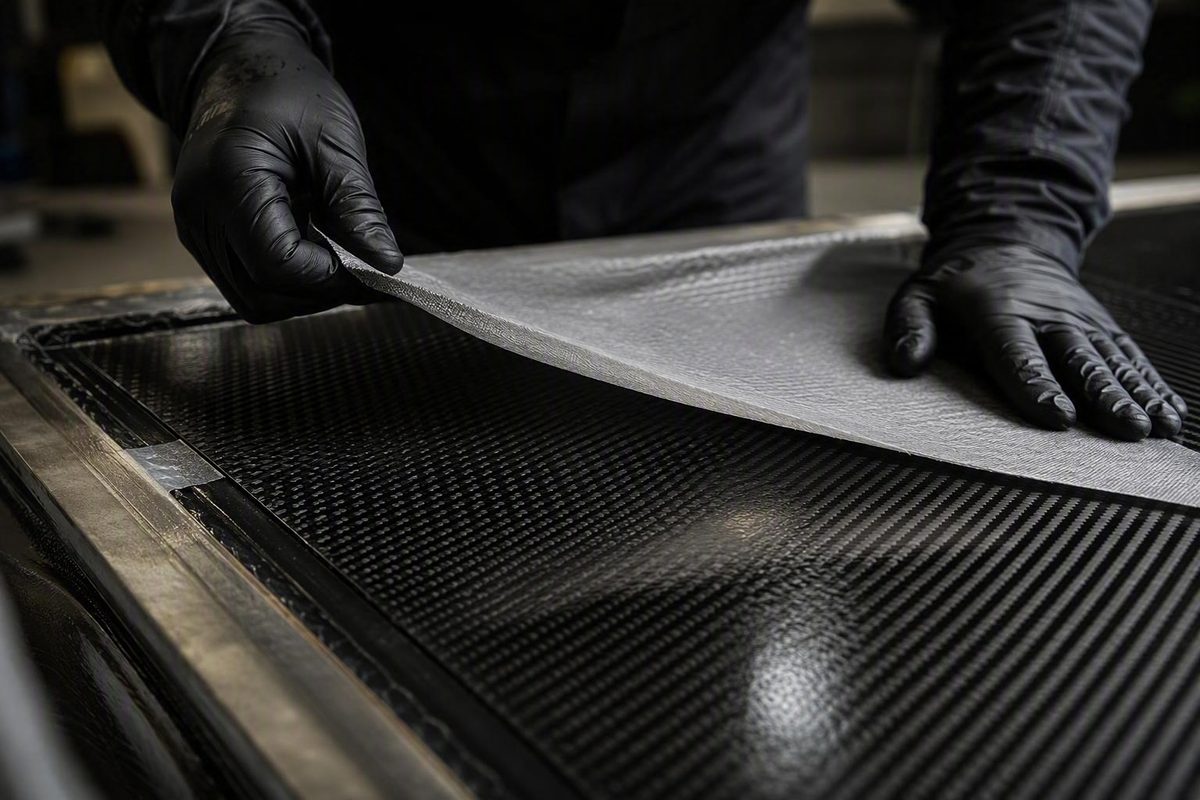
- A shop guide to cleaner composite surfaces and more reliable secondary bonds*
Peel ply is a temporary process layer—not a shortcut that makes every cured laminate automatically ready for adhesive, paint, or another laminate. Used correctly, it protects the working face, leaves a repeatable texture, and can reduce abrasive finishing. Used without regard to fiber, coating, resin compatibility, cure cycle, or the next operation, it can leave residue, adhere too strongly, expose reinforcement, or produce a surface that looks prepared but bonds poorly.
The practical rule is to treat peel ply as one part of a controlled material-and-process combination. Selection, application, cure, removal, inspection, and final surface preparation all matter.
What peel ply is—and what happens when it is removed
Peel ply is a disposable woven process fabric placed directly against a wet composite laminate. It is used over carbon fiber or fiberglass in wet lay-up, vacuum bagging, resin infusion, and some prepreg processes. After the laminate reaches the cure condition specified for the process, the fabric is peeled away.
It is normally sacrificial. Unlike the carbon, glass, aramid, or other reinforcement that carries load in the finished part, ordinary peel ply is not intended to remain as structural reinforcement. Retailer application guidance likewise describes it as temporary cloth that is removed after full cure (Fiberglass Warehouse’s peel-ply user guide).
During processing, resin enters the weave or passes through its openings. Once cured, the resin surrounding the fabric is no longer a flat, uninterrupted film.
Removal fractures resin at the interface. The resulting surface may contain fabric-shaped cavities, fractured-matrix regions, ridges, and peaks and valleys corresponding to the weave. Peel-ply fibers or treatments can remain behind, while aggressive removal can sometimes expose the laminate reinforcement. A peer-reviewed review reports that peeling can alter both surface morphology and elemental composition, leaving fractured matrix, fabric cavities, retained material, or exposed reinforcement (Kanerva and Saarela’s review of peel-ply surface treatment).
A successful exposed face usually looks:
- Matte rather than glossy
- Textured rather than glass-smooth
- Hard and dry
- Reasonably uniform across the intended work area
- Free from trapped fabric, lifted fibers, glossy islands, and fold marks
That texture is useful because peel ply can protect the underlying resin surface from handling, dust, overspray, and other gross contamination while it remains in place. It can create a controlled starting surface for overlamination, adhesive bonding, painting, fairing, or priming. It may also reduce the aggressive sanding otherwise needed to remove an exposed glossy resin-rich layer.
The qualification is important: a newly exposed texture is only a starting condition. Cleanliness and bond performance depend on the fabric chemistry, sizing or coating, weave, laminate resin, cure conditions, storage history, removal behavior, adhesive or coating, and final preparation. A visible fabric imprint proves that the cloth contacted the surface; it does not prove that the surface is contaminant-free or qualified for bonding.
Where peel ply belongs in the layup stack
Peel ply belongs directly against the laminate face that will later be exposed. It should not be separated from that face by ordinary release film, breather, bleeder, or infusion mesh unless a qualified process specifically requires that arrangement.
For a straightforward wet lay-up, the conceptual sequence is:
- Tool, mould, former, or previously cured substrate
- Structural reinforcement and laminating resin
- Peel ply
- Any process-specific consolidation or absorbent materials
- External pressure system, if used
The tool side may also include mould release, gelcoat, surfacing film, or another specified layer. Peel ply goes on the laminate face where its post-removal texture is wanted.
For a typical vacuum-bagging arrangement, moving outward from the laminate:
- Wetted structural reinforcement
- Peel ply
- Specified porous or non-porous release film
- Bleeder and/or breather
- Vacuum bag
This is a common sequence, not a universal recipe. The selected resin system, consumable data, and manufacturing specification should govern the actual stack.
In resin infusion, peel ply also normally contacts the laminate. Separate flow media may then distribute resin across the preform. Depending on the process, the stack may include perforated film, distribution mesh, infusion channels, membranes, or combined consumables. A stack developed for one resin, reinforcement architecture, or part thickness should not be transferred unchanged to another process.
The terminology is easy to blur because some products combine functions. The underlying roles remain different:
- Peel ply: A removable woven layer that contacts the laminate and leaves a fabric-textured surface.
- Porous release film or release fabric: A release layer that permits a controlled amount of resin, air, or volatiles to pass. Hole pattern, permeability, and coating affect bleed and evacuation.
- Non-porous release film: A barrier that prevents resin passage. When used as the laminate-contact layer in an appropriate process, it can leave a smoother face. When installed above peel ply, it acts as a barrier but does not erase the peel-ply imprint below.
- Bleeder: Absorbent material intended to take up excess resin.
- Breather: Material that maintains an air path under the bag so vacuum can communicate across the work.
A manufacturer’s consumables overview similarly distinguishes porous release materials, which allow resin, volatiles, and trapped air to pass, from non-porous products that act as barriers and can leave a smooth face when used in the applicable contact arrangement (Airtech’s peel-ply and release-fabric overview).
“Release fabric” is especially ambiguous. Some suppliers use the term for PTFE-coated fiberglass, while others apply similar language to treated peel plies. Combination products may provide both release and bleed functions. Product names therefore do not replace the technical datasheet.
Using peel ply, release film, release fabric, bleeder, breather, and flow media interchangeably can create major process errors. A non-porous barrier can stop intended bleed or evacuation. Define every layer by its documented function before closing the bag.
How to choose the right fabric
“Polyester or nylon?” is not enough information to approve peel ply. Fiber matters, but coatings, sizing, scouring, heat setting, weave, weight, porosity, and cure conditions can be equally important.
Use a selection matrix for purchasing and process review:
| Selection field | What to record | Why it matters |
|---|---|---|
| Fiber material | Polyester, nylon/polyamide, fiberglass, or another documented fiber | Influences temperature capability, chemical interaction, drape, strength, and release |
| Surface treatment | Uncoated, scoured, heat-set, release-coated, sized, fluoropolymer-treated, silicone-treated, or unspecified | Transferable treatments may affect paint or adhesive bonding |
| Documented temperature limit | Maximum process temperature and any time-dependent limitation | The fabric must tolerate cure and post-cure without unacceptable shrinkage, degradation, or interaction |
| Resin compatibility | Exact epoxy, polyester, vinyl ester, phenolic, thermoplastic, or other system | A generic fiber label does not establish compatibility with a particular resin |
| Porosity | Air and resin permeability, perforation, or semi-permeable behavior | Affects bleed, evacuation, resin retention, and infusion behavior |
| Weave and areal weight | Weave, mass per unit area, thickness, and tracer yarn | Influences drape, resin uptake, imprint, tear strength, and removal |
| Drape | Ability to conform over corners, recesses, and compound curves | Poor conformity promotes bridging, folds, resin pockets, and incomplete texture |
| Release behavior | Expected peel force, recommended direction, and coating status | Excessive adhesion can damage the laminate; easy release does not prove cleanliness |
| Intended surface use | Cosmetic finish, paint, overlamination, adhesive bonding, protection, or process control | The best fabric for removal may not be the best choice for a critical bond |
| Supplier documentation | Current datasheet, treatment declaration, lot traceability, storage instructions, and change-control status | Supports repeatability and prevents approval by product name alone |
Polyester
Polyester is a common general-purpose option for wet lay-up, bagging, and infusion. It is available in multiple weights, weaves, temperature classes, and treatments. Its prevalence does not mean every polyester cloth is clean, uncoated, compatible with every resin, or suitable for direct bonding.
Nonreleased polyester is often considered when the objective is to avoid transferable release agents. Even then, bond behavior remains specific to the laminate resin, adhesive, cure, and fabric construction. Labels such as “natural polyester” do not constitute a complete treatment declaration.
Nylon or polyamide
Nylon grades are available for elevated-temperature and prepreg processes. One specialist retailer, for example, distinguishes a standard polyester grade from a Nylon 66 grade intended for higher-temperature use. The listing illustrates why temperature capability must be confirmed at product level rather than inferred from a generic material name (Easy Composites’ polyester and Nylon 66 listings).
Nylon presents two different concerns that should not be collapsed into a universal ban.
First, released nylon may carry silicone or another treatment that transfers to an epoxy surface and interferes with adhesion. Second, clean polyamide can interact strongly with curing epoxy under some elevated-temperature conditions, making removal unusually difficult. These outcomes depend on the actual product, resin, and cure; they do not establish that every nylon peel ply is unsuitable for epoxy.
Fiberglass and tear plies
Fiberglass peel ply is a specialty option that manufacturers associate with demanding or higher-temperature processing. Suitability must be established from product-specific technical data, including coating, weave, temperature range, and resin compatibility.
Resin-impregnated peel plies are often called tear plies.
Coated versus uncoated fabric
An uncoated or nonreleased fabric may reduce concern about transferable release agents, provided the supplier documents how it was manufactured and cleaned. “Uncoated” does not necessarily mean free from sizing, processing aids, oils, or other contamination.
Manufacturers describe release-coated fabrics as useful where complex geometry, thin laminates, or aggressive resin systems would otherwise make removal difficult. The tradeoff is that transferable treatment can create a bonding or finishing risk. A coated fabric can be appropriate when easy release is the controlling need, but the specified final preparation must account for its coating.
Weave, weight, and handling
Supplier guidance presents weave and weight as practical selection variables rather than universal predictors of performance.
Lighter fabrics may drape more readily and leave a finer imprint. They may also provide less tear resistance and can be harder to remove intact if the resin interaction or geometry is unfavorable.
Heavier fabrics may resist tearing and be easier to pull from large areas, but they can retain more resin, conform less readily, and leave a coarser pattern. That pattern may improve process visibility while requiring more primer, fairing, or sanding before a cosmetic finish.
These are tendencies, not rules. A tightly woven lightweight fabric can be stiff, and a heavier fabric can be engineered for good drape. Selection should rely on a current technical datasheet and representative trials—not a retailer snippet or the words “nylon” and “polyester” alone.
How to apply, cure, and remove peel ply
A good result begins before resin is mixed. Confirm the exact peel-ply product against:
- Laminate resin
- Cure and post-cure temperatures
- Wet lay-up, bagging, infusion, or prepreg process
- Reinforcement type and surface-fiber direction
- Part geometry and laminate thickness
- Intended adhesive, coating, or later laminate
- Required final preparation
If the material cannot be identified beyond a generic fiber name, do not use it as the basis for a consequential bonding process.
1. Plan and cut before mixing
Cut the fabric oversize so it has a clean tab or accessible edge for removal. Keep overlaps away from critical bond lines and cosmetic transitions where practical.
For compound curves, use darts, shaped strips, or smaller patches rather than forcing a flat woven sheet to conform.
Stage the cloth on a clean surface. Use clean tools and avoid unnecessary handling with contaminated gloves.
2. Wet the structural reinforcement properly
Complete laminate wet-out according to the resin and process instructions. Peel ply is not a substitute for getting resin into the structural reinforcement.
Place the peel ply in intimate contact with the final wetted reinforcement layer. Depending on the product and process, resin may rise through from below, be applied from above, or arrive during infusion. Follow the documented method rather than assuming every fabric must be manually flooded.
3. Remove air, bridging, and folds
Work the fabric down gently and uniformly. Correct:
- Trapped air
- Bridging over corners or depressions
- Folds and wrinkles
- Distorted seams
- Dry or white-looking areas
- Resin pools
- Unsupported edges
White or visibly dry patches can indicate inadequate resin contact or trapped air and should be corrected before cure. Vacuum pressure should not be treated as a guarantee that every bridge or fold will disappear after the bag is closed.
Avoid excessive squeegee pressure. The objective is intimate contact and the resin condition required by the process—not maximum resin removal.
4. Complete the process stack
For bagged work, add the specified release, bleed, breathing, flow, and bagging materials in their approved order.
For infusion, verify that peel-ply seams, flow-media boundaries, resin inlets, and vacuum outlets support the intended flow strategy. Ordinary peel ply should not be assumed to perform as a resin-control membrane or substitute for engineered infusion consumables.
5. Cure according to the resin system
Follow the resin manufacturer’s cure schedule, including specified ramps, dwells, cooling, and post-cure. There is no universal number of hours after which every peel ply should be removed.
Do not peel while the resin remains soft or gelled.
6. Remove with control
After the specified cure, start at the planned tab or edge. A low-angle pull that keeps the peel front near the laminate is a common supplier-recommended starting technique, but product documentation and the qualified process must control the actual direction and angle.
Use a steady pace. If removal force rises abruptly, the cloth begins shredding, or reinforcement starts lifting, stop and investigate rather than pulling harder.
Thin skins and unidirectional laminates require particular care. Tenacious removal can expose carbon, delaminate the surface, or damage a unidirectional laminate, especially when peeling across the surface-fiber direction (Hart-Smith, Redmond, and Davis’s SAMPE conference paper). Follow the approved peel direction and stop if fibers lift or the laminate begins separating.
The removed, resin-contaminated cloth is waste. Do not clean, reverse, or reuse it; its porosity, release behavior, and cleanliness are no longer controlled.
Does peel ply eliminate sanding before secondary bonding?
Sometimes—but only when the material and process documentation permits direct bonding and the procedure has been qualified for that joint. Peel-ply removal alone should not be assumed sufficient for every adhesive bond or secondary laminate.
The first distinction is between two bonding conditions.
Chemical recoating occurs when another compatible resin coat or laminate is applied within the resin manufacturer’s approved recoat window. The existing surface may still be chemically receptive, subject to the manufacturer’s preparation and contamination controls.
Mechanical or adhesive bonding to a fully cured laminate relies on a prepared cured surface and the selected adhesive or laminating resin. A fabric texture may help, but it does not recreate an uncured chemical bond.
Do not transfer a “no sanding within the recoat window” instruction to a fully cured structural joint. Conversely, do not assume that a correctly timed chemical recoat requires the same preparation as a cured secondary bond.
Why the answer varies
Bond performance can change with:
- Peel-ply fiber chemistry
- Weave and filament geometry
- Sizing, scouring, heat setting, or release treatment
- Laminate resin and cure state
- Adhesive chemistry
- Cure temperature and pressure
- Moisture exposure and storage history
- Removal direction and force
- Retained fibers or residue
- Cleaning and abrasion after removal
The peer-reviewed literature review found no simple generalized relationship among roughness, surface energy, elemental composition, and subsequent adhesion. It also reported that peel-ply-prepared joints in the reviewed literature were generally less strong in shear strength or fracture toughness than joints prepared by abrasive mechanical methods.
That does not mean every peel-ply-only joint will fail. It means that visual texture or a single roughness measurement cannot establish reliable performance across different material systems.
The aerospace engineering position
A 1996 aerospace-focused conference paper by authors associated with McDonnell Douglas Aerospace and the Royal Australian Air Force took a deliberately conservative position. The authors treated peel ply primarily as protection from gross contamination and recommended low-pressure grit blasting for dependable structural bonding. They reported silicon on tested released nylon, attributed it to silicone release treatment, and warned that clean nylon could interact so strongly with curing epoxy that removal damaged the laminate.
This is a historical aerospace engineering position, not a universal instruction for every boat, fairing panel, mould, or hobby laminate. Current drawings, repair manuals, adhesive specifications, and organization-specific processes govern present-day work. The paper remains useful because it shows why a critical bond should not be approved merely because generic peel ply was used.
Nylon and polyester are not single material conditions
Released nylon may transfer silicone or another treatment. Untreated nylon avoids that particular release-agent concern but may interact strongly with some epoxies during elevated-temperature cure. A proprietary nylon product with controlled sizing and documented compatibility may behave differently again.
Nonreleased polyester may avoid some concerns associated with released nylon. It can still produce weak or strong bonds depending on the laminate resin, fabric, cure, adhesive, environment, and final preparation. Released polyester may also introduce a transferable treatment.
Accordingly, neither “never use nylon” nor “polyester is automatically bond-ready” is defensible. The complete product designation and treatment declaration matter.
A risk-based decision
For critical structural joints, follow the approved drawing, repair manual, adhesive specification, or engineering process. If it requires sanding, grit blasting, solvent controls, plasma treatment, or another preparation after peeling, perform it. Do not waive a specified step because the exposed surface looks rough.
For noncritical overlamination, manufacturer guidance may permit direct application after peeling. Confirm that the fabric is the approved product, inspect the surface, and comply with all cleaning or abrasion requirements.
For painting or cosmetic finishing, texture and coating compatibility may matter more than structural bond durability. Even here, unknown release treatment or retained residue can cause adhesion and appearance defects.
Whenever failure would be consequential, make representative coupons using the production laminate, peel ply, cure cycle, storage interval, removal method, surface preparation, adhesive, bond-line arrangement, and adhesive cure. Compare the proposed peel-ply-only condition with the specified abrasive preparation. A test on another resin or differently treated fabric does not qualify the production combination.
What finish peel ply leaves—and when it is worth using
A successful post-peel surface is hard, dry, matte, textured, and reasonably uniform. It should not be described as automatically clean or contaminant-free. Those properties depend on controlled materials and handling, not merely a visible weave pattern.
Peel ply can reduce heavy sanding by preventing an exposed glossy resin face and protecting the laminate during handling or controlled storage. Leaving an approved fabric in place until a later operation may help preserve the underlying process surface, provided the applicable specification allows that storage condition and interval.
The imprint also provides useful visual process information. Uniform texture suggests consistent contact. Glossy islands, interrupted weave, and fold marks identify areas that need evaluation. That visibility is useful, but the imprint is not a high-gloss cosmetic finish.
For paint or clear coat, expect some combination of:
- Weave print
- Seam ridges
- Local resin-rich lines
- Peaks and valleys
- Pinholes
- Transition marks at fabric edges
Primer, fairing compound, filling, and sanding may still be required. A fine peel ply can reduce the work, but clear coating directly over a coarse imprint will normally preserve rather than hide the texture.
For overlamination, continue to distinguish fully cured mechanical bonding from chemical recoating within the resin system’s documented window. Peel ply is often useful when the first laminate must cure before the next operation. It may be unnecessary when compatible coats are applied within an approved recoat interval and the manufacturer does not require it.
Peel ply can also appear in less conventional positions. In one demonstrated mouldless process, it was placed over a release-film-covered foam former, wetted with epoxy, and followed by structural reinforcement. The purpose was to improve the consistency of the eventual inner face and facilitate later bonding (Easy Composites’ mouldless laminating example). This is one process example, not a universal stack: the peel ply was placed on the former side because that was the surface intended for later exposure.
Peel ply may be unnecessary when:
- The face will remain cosmetic and is formed against a suitable tool surface
- No later bonding, coating, or overlamination is planned
- The qualified system uses another surfacing layer
- A chemical recoat will occur within the approved window
- Added resin retention, consumable cost, removal work, or waste outweighs the benefit
- Geometry makes reliable application or removal impractical
Do not credit peel ply alone with making a laminate lighter, stronger, more durable, or completely tack-free. Those outcomes depend on the complete laminate design, resin content, cure, consolidation, environment, and finishing system.
Post-removal inspection and troubleshooting
Treat removal as the start of a documented quality gate—not proof that the surface is acceptable. Where required, record the fabric product and lot, removal condition, inspection result, defects, and subsequent preparation.
Post-peel inspection checklist
Inspect the complete work area for:
- Glossy or untextured patches
- Retained peel-ply fibers
- Visible powder, film, staining, or residue
- Fabric ridges and seam steps
- Pinholes and voids
- Wrinkles or fold impressions
- Bridging marks
- Resin-starved regions
- Exposed reinforcement
- Lifted surface fibers
- Local delamination
- Edge damage caused during peeling
- Unexpectedly soft, tacky, or smeared resin
- Foreign material introduced after removal
Use lighting that reveals both color and surface relief. Low-angle lighting can make glossy patches and ridges easier to see. Magnification may be appropriate when checking for retained filaments or suspected fiber damage.
Glossy or untextured patches
It should be evaluated before adhesive or another laminate is applied.
Determine the extent and likely cause. The governing procedure may allow controlled abrasion and reinspection, or the defect may exceed acceptance criteria. On a critical part, disposition belongs to the applicable engineering or repair authority.
Shredding or retained fabric
Possible contributors include:
- Insufficient tear strength
- An unsuitable lightweight construction
- Excessive adhesion to the cured resin
- Aggressive resin–fabric interaction
- Difficult geometry
- Poor seam or tab planning
- Incorrect peel direction
- Unsuitable removal technique
There is no universal cause. Forum users have reported particular lightweight polyester products shredding during removal, but those anecdotes do not establish the behavior of an entire fiber class (Boat Design Net discussion of nylon and polyester peel ply).
Do not bury retained fabric beneath a structural adhesive. Remove it using the approved method, inspect the laminate for damage, and complete the specified final preparation. Retained fibers and other material can alter the treated surface, while exposed reinforcement may indicate that removal fractured more than the intended resin interface.
Unusually difficult removal
Consider:
- Resin incompatibility
- Excessive cure or post-cure temperature
- Undocumented fabric treatment
- Polyamide–epoxy interaction
- Cloth shrinkage or distortion
- Geometry that mechanically locks the weave
- Peel direction relative to the surface reinforcement
- Inadequate release characteristics
Stop if reinforcement begins lifting or the laminate surface starts separating. More force is not a valid corrective action when removal is damaging the substrate.
Unexpectedly easy release
Low peel force does not prove success. High peel force likewise does not prove that the surface is cleaner or more bondable.
Check the material identity and treatment declaration, inspect the exposed surface, and apply any required test or preparation. Peel force is not an acceptance criterion unless the qualified process explicitly makes it one.
Ridges, bumps, and seam marks
Fabric edges, overlaps, and wrinkles can leave raised resin features. Peel-ply ridges and bumps may trap air and contribute to voids if a later adhesive or laminate cannot wet the valleys properly (Kanerva and Saarela’s review of peel-ply surface treatment).
Use only the remedy allowed by the governing adhesive, repair, or manufacturing specification. Do not assume that a rougher surface is always better: the texture must be compatible with adhesive wetting and the required bond line.
Exposed or lifted reinforcement
Visible carbon or glass, fuzzed fibers, lifted bundles, or ply separation can indicate laminate damage rather than successful surface preparation. Tenacious peeling—particularly across the surface-fiber direction—can expose reinforcement or delaminate thin and unidirectional laminates.
Do not simply cover the area with resin or adhesive. Route it through the applicable inspection, engineering, or repair disposition.
A procurement and process-qualification checklist
Peel ply should be purchased and controlled as an engineered consumable whenever it affects bonding, coating adhesion, or part acceptance.
Supplier information to obtain
Request the current technical datasheet and record:
- Manufacturer and exact product name
- Fiber material
- Weave and construction
- Areal weight and thickness
- Width and tracer identification
- Porosity or permeability
- Maximum process temperature
- Time-at-temperature restrictions
- Recommended resin systems
- Storage conditions and shelf life, if applicable
- Recommended removal method
- Intended applications
Obtain a written declaration covering:
- Release coatings
- Silicone
- Fluoropolymer or PTFE treatments
- Sizing
- Scouring
- Heat setting
- Dyes and tracer yarns
- Lubricants or processing aids
- Other surface treatments
Do not assume that white, natural, or undyed cloth is untreated. Appearance cannot establish surface chemistry.
Confirm the complete material combination
Compatibility review should identify the exact:
- Laminate resin
- Reinforcement and surface-ply orientation
- Peel-ply product
- Cure and post-cure cycle
- Adhesive, primer, paint, or later laminating resin
- Cleaning agents
- Abrasive material and grit, where specified
- Environmental exposure
- Maximum interval between peeling, preparation, and bonding
A commercial statement that a product is “suitable for epoxy” is not equivalent to qualification with a particular epoxy laminate and adhesive.
Document the process
The controlled work instruction should define:
- Material identification and lot control
- Cutting and handling precautions
- Seam and overlap locations
- Layup-stack order
- Application and wet-out method
- Cure and post-cure schedule
- Permitted storage condition before removal
- Removal direction, angle, and tools
- Visual and dimensional inspection criteria
- Cleaning and abrasion steps
- Time limit between final preparation and bonding
- Handling controls after surface preparation
- Nonconformance and repair route
Where a treatment change could create a safety or durability risk, require batch traceability, supplier change notification, or appropriate incoming controls. Two rolls sold under similar generic descriptions may not have identical surface treatments.
Qualify consequential bonds
Representative coupons should reproduce the production process closely enough to expose relevant risks. Include the actual laminate resin, surface ply, peel-ply product or lot, cure, storage, removal, cleaning, abrasion, adhesive, and adhesive cure.
Compare at least:
- The proposed peel-ply-only condition
- The approved abrasive-preparation condition
Additional conditions may examine storage duration, moisture exposure, product changes, or alternate peel directions. Evaluate failure mode as well as apparent strength. A result from another laminate, adhesive, or cure cycle is not a universal approval value.
Distinguish supplier-stated performance from independently demonstrated performance. Claims about bond readiness, resin control, labor savings, weight reduction, or durability may identify products worth investigating, but they do not replace qualification.
Use a three-level decision rule:
- Cosmetic finishing: Prioritize manageable texture, drape, clean removal, and coating compatibility. Expect filling or sanding where appearance requires it.
- Noncritical overlamination: Require documented resin compatibility, controlled application, and post-removal inspection. Add abrasion whenever the resin or process guidance requires it.
- Critical structural bonding: Use the approved preparation, maintain material and batch controls, and qualify the complete process with representative coupons.
Frequently asked questions
Which side of the laminate does peel ply go on?
Peel ply goes directly against the wet laminate face that you want to expose later. On an open-face lay-up, that is usually the final reinforcement layer. In a conventional vacuum stack, peel ply contacts the laminate, while release film, bleeder, breather, and the vacuum bag sit farther outward.
In a specialized mouldless or two-sided process, it may be placed on a former-side face if that is the surface intended for later exposure. Its position is defined by the desired finished face and the qualified stack—not by a rule that it must always be on the “top” of the part.
Is nylon or polyester peel ply better for epoxy?
Neither is universally better. Nylon products may offer useful temperature capability or release behavior, but released nylon can introduce coating concerns and clean nylon can adhere strongly to some epoxy systems during elevated-temperature cure. Polyester may avoid some of those concerns when documented as nonreleased, but it does not guarantee a strong or durable bond.
Choose by exact product data: treatment, sizing, weave, weight, temperature limit, resin compatibility, release behavior, and intended post-cure operation. For a consequential epoxy bond, qualify the complete laminate–peel-ply–adhesive combination.
Must peel ply be removed before the resin is fully cured?
Normally, no. Ordinary dry peel ply is generally removed after the resin reaches the cure condition specified by the process. Pulling it while the resin is soft or gelled can smear the surface, disturb reinforcement, and leave an inconsistent result.
There is no universal removal time. Follow the resin and peel-ply documentation, including any special instructions for prepreg, tear ply, staged cure, or post-cure processing.
Can peel ply produce a smooth, paint-ready or clear-coat-ready finish?
It can create a relatively uniform face and reduce heavy sanding, but it normally leaves visible fabric texture rather than a smooth, high-gloss finish. Weave print, ridges, seams, pinholes, and local variation may still require primer, fairing, filling, or sanding.
A finer fabric may leave a subtler imprint, but paint readiness also depends on coating compatibility, cleanliness, flatness, and the required appearance. For clear coating, assume the texture will remain visible unless it is deliberately filled and finished.
Can peel ply be reused?
No. Peel ply is a single-use consumable. After cure and removal, it contains cured resin and may be distorted, torn, or contaminated. Its porosity, release behavior, and cleanliness can no longer be controlled.
The concise shop rule is this: choose peel ply by documented material and process compatibility, place it directly against a properly wetted laminate, cure and remove it without damaging the surface, and inspect what remains. Use the texture to reduce unnecessary finishing, but never let the fabric’s name substitute for an approved preparation procedure. Where bond failure matters, confirm the coating status, follow the resin and adhesive requirements, perform any specified abrasion, and qualify the complete process with representative coupons.